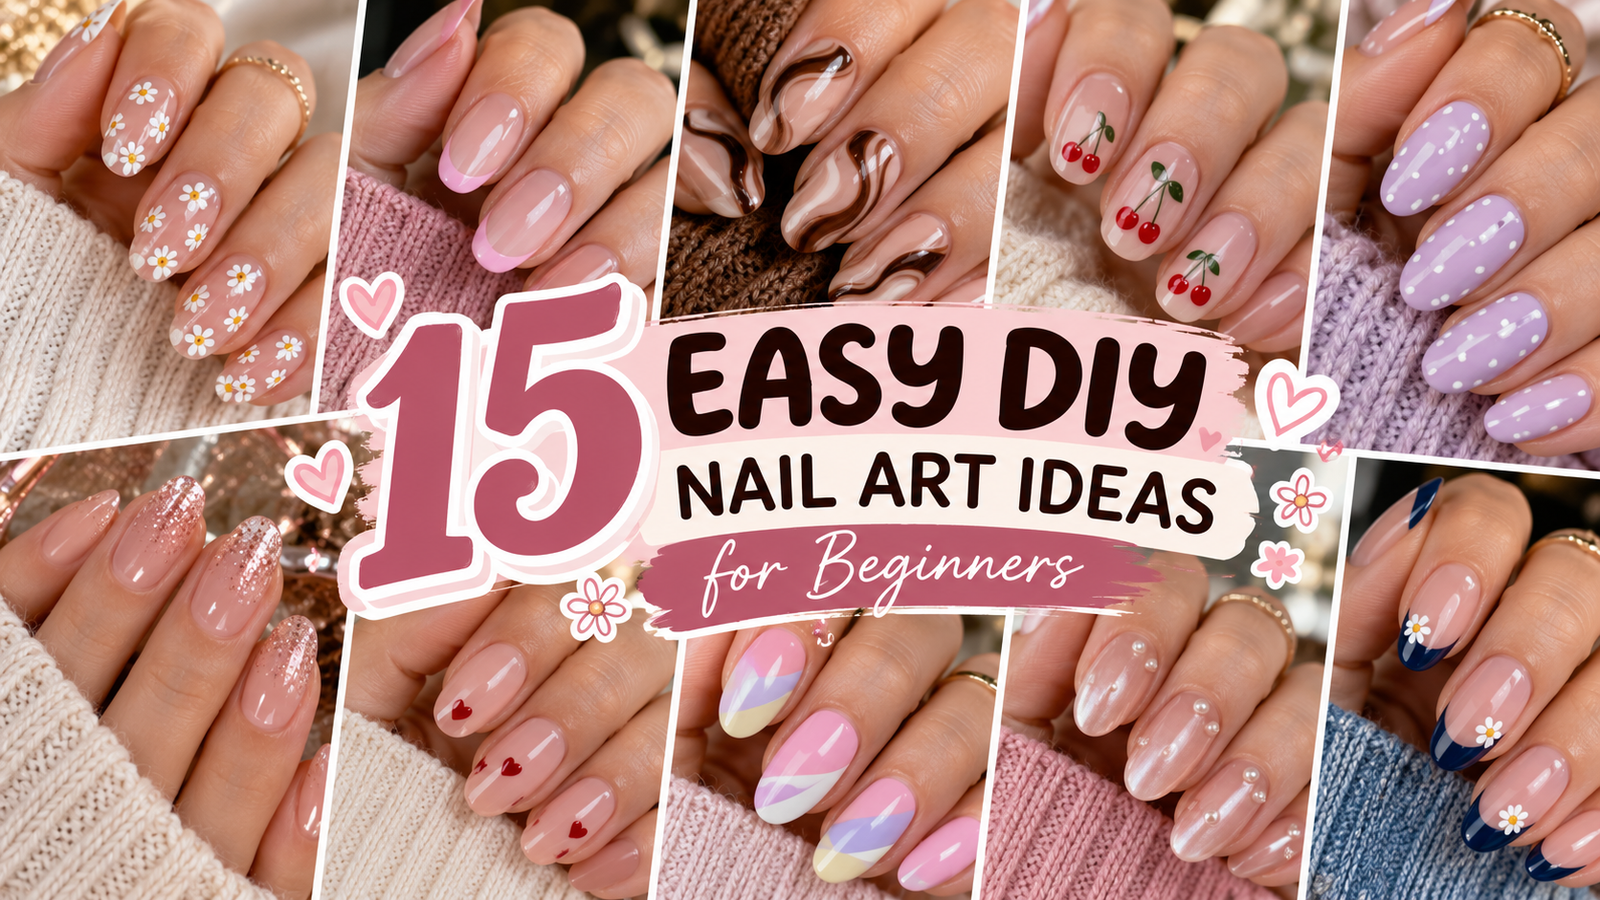
DIY nail art doesn’t have to be complicated or require expensive salon equipment. With a few nail polish colors, simple household tools, and a little creativity, you can create beautiful manicures at home that look surprisingly professional.
From tiny floral patterns and delicate French tips to glossy jelly nails and playful heart designs, there are countless ways to make your nails look stylish without spending hours at a nail salon.
And the best part? You don’t need to be an experienced nail artist.
Many of the prettiest nail designs use simple dots, thin lines, soft gradients, and tiny decorative details that are easy to recreate with practice.
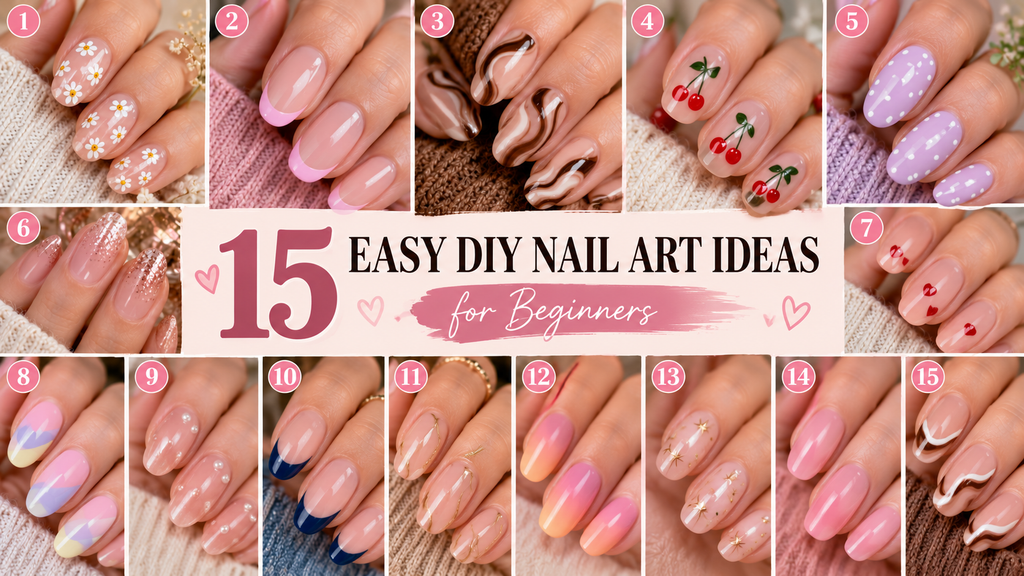
Whether you love minimalist nails, soft pink manicures, colorful summer designs, or elegant neutral shades, these 15 easy DIY nail art ideas for beginners will help you discover your next favorite manicure.
Most of these designs work beautifully on short, natural nails, although you can also recreate them on longer nails.
Let’s explore 15 cute, creative, and beginner-friendly nail designs that look much more difficult than they actually are.
1. Tiny Daisy Flower Nails
Tiny Daisy Flower Nails are one of the cutest and easiest ways to experiment with floral nail art.
This design features miniature white daisies painted over a soft nude, blush pink, or sheer milky base.
Each flower has five tiny petals surrounding a delicate yellow center.
The finished manicure feels fresh, feminine, and perfect for spring or summer.
You can create one flower on each nail for a minimalist appearance or add several small daisies for a more playful look.
Why you’ll love it: The flowers look detailed, but each one is made using simple dots.
Best for: Short nails, spring manicures, and cute everyday nail art.
Difficulty: Very easy.
What you’ll need: Nude nail polish, white polish, yellow polish, and a dotting tool or toothpick.
How to recreate it:
- Apply a base coat and let it dry.
- Paint your nails with a soft nude or pale pink shade.
- Use a dotting tool to create five small white dots in a circle.
- Add one tiny yellow dot in the center.
- Allow the design to dry before sealing it with a glossy top coat.
Styling tip: Try placing one tiny daisy near the corner of each nail for a delicate, expensive-looking finish.
2. Blush Pink Micro French Tips
Blush Pink Micro French Tips are a modern, minimalist version of the classic French manicure.
Instead of thick white tips, this design features an extremely thin line of soft pink polish along the free edge of each nail.
The delicate color creates a clean, elegant appearance that works beautifully on short nails.
You can choose baby pink, dusty rose, or muted mauve depending on your personal style.
Why you’ll love it: The thin French tip looks sophisticated and requires very little nail art.
Best for: Everyday nails, school-friendly manicures where permitted, and minimalist beauty lovers.
Difficulty: Easy.
What you’ll need: Sheer nude polish, pink polish, and a fine nail art brush.
How to recreate it:
- Apply a sheer nude base.
- Allow the polish to dry completely.
- Dip a fine brush into your chosen pink shade.
- Carefully paint a thin line along each nail tip.
- Finish with a glossy top coat.
Styling tip: Keep the line as thin and even as possible for a refined appearance.
3. Chocolate Swirl Nails
Chocolate Swirl Nails combine warm brown tones with beautiful curved patterns.
This manicure features a creamy beige or nude base decorated with thin chocolate-brown swirls.
The curved lines create a soft, artistic effect that feels modern and luxurious.
You can make the swirls different on every nail for a more creative finish.
Why you’ll love it: The abstract pattern doesn’t require perfect symmetry, making it forgiving for beginners.
Best for: Fall nails, neutral manicures, and elegant everyday looks.
Difficulty: Easy.
What you’ll need: Beige polish, chocolate-brown polish, and a thin nail art brush.
How to recreate it:
- Apply a beige or nude base color.
- Let the base dry.
- Use a fine brush to paint one curved brown line across the nail.
- Add a second, thinner swirl if desired.
- Seal the design with a glossy top coat.
Styling tip: Combine espresso brown and caramel shades for a beautiful dimensional effect.
4. Mini Cherry Nail Art
Mini Cherry Nail Art is a playful design inspired by tiny red cherries.
The manicure features small cherry pairs painted over a soft nude or milky pink base.
Each cherry is created using two red dots connected to delicate green stems.
The result is adorable, slightly retro, and perfect for anyone who loves cute nail designs.
Why you’ll love it: The cherries look intricate but require only dots and a few thin lines.
Best for: Summer nails, playful manicures, and Pinterest-inspired nail art.
Difficulty: Easy.
What you’ll need: Nude polish, cherry-red polish, green polish, and a toothpick.
How to recreate it:
- Paint your nails with a sheer pink or nude base.
- Use a dotting tool to create two small red circles.
- Allow the red polish to dry slightly.
- Draw two thin green stems connecting above the cherries.
- Add a glossy top coat after the artwork dries.
Styling tip: Create cherries on only two accent nails and keep the others glossy red for a coordinated look.
5. Soft Lavender Polka Dot Nails
Soft Lavender Polka Dot Nails are simple, feminine, and beautifully playful.
The design features a pale lavender base decorated with tiny white dots.
The dots can be arranged in neat rows or scattered randomly for a more relaxed appearance.
You can also reverse the colors by using a milky white base with lavender dots.
Why you’ll love it: Polka dots are among the easiest nail art patterns to create at home.
Best for: Short nails, spring manicures, and beginner nail art practice.
Difficulty: Very easy.
What you’ll need: Lavender polish, white polish, and a dotting tool.
How to recreate it:
- Apply two thin coats of lavender polish.
- Allow the color to dry.
- Dip a dotting tool into white polish.
- Create small dots across each nail.
- Finish with a clear top coat.
Styling tip: Use smaller dots for a more delicate, sophisticated finish.
6. Rose Gold Glitter Gradient Nails
Rose Gold Glitter Gradient Nails are perfect for anyone who loves a little sparkle without complicated nail art.
This design features a soft pink or nude base with delicate rose gold glitter concentrated near the nail tips.
The glitter gradually fades toward the center, creating a beautiful shimmering gradient.
The finished manicure looks elegant, feminine, and suitable for special occasions.
Why you’ll love it: The glitter gradient is easy to blend and doesn’t require precise lines.
Best for: Parties, weddings, birthdays, and festive manicures.
Difficulty: Easy.
What you’ll need: Nude polish, rose gold glitter polish, and a small makeup sponge.
How to recreate it:
- Apply a sheer nude or blush pink base.
- Allow the polish to dry completely.
- Dab a small amount of glitter polish onto a makeup sponge.
- Gently press the glitter near the nail tips.
- Repeat lightly to build a soft gradient.
- Finish with a glossy top coat.
Styling tip: Choose fine rose gold glitter rather than chunky glitter for a more luxurious appearance.
7. Tiny Heart Accent Nails
Tiny Heart Accent Nails are romantic, minimal, and incredibly cute.
This design features one or two miniature hearts placed over a sheer pink, nude, or milky white base.
The hearts can be painted in red, pink, burgundy, or even chocolate brown.
For a more understated manicure, add a single tiny heart near the cuticle or outer corner of each nail.
Why you’ll love it: The tiny hearts add personality without making the manicure feel overly decorative.
Best for: Valentine’s Day, date nights, everyday nails, and cute minimalist manicures.
Difficulty: Very easy.
What you’ll need: Nude polish, red or pink polish, and a toothpick.
How to recreate it:
- Apply your chosen base color.
- Use a toothpick to place two small dots side by side.
- Gently drag each dot downward to meet at one point.
- Adjust the shape until it resembles a small heart.
- Allow the hearts to dry before applying top coat.
Styling tip: Try tiny burgundy hearts over a milky pink base for a sophisticated romantic look.
8. Pastel Color Block Nails
Pastel Color Block Nails are a fun way to experiment with multiple colors in one manicure.
This design features two or three soft pastel shades arranged in clean geometric sections.
Popular combinations include lavender and mint, baby pink and peach, or butter yellow and sky blue.
The finished look feels playful, artistic, and modern.
Why you’ll love it: Nail tape helps create clean sections without advanced painting skills.
Best for: Spring, summer, colorful manicures, and creative nail art.
Difficulty: Easy to moderate.
What you’ll need: Two pastel nail polishes, nail art tape, and a top coat.
How to recreate it:
- Apply your first pastel color and let it dry fully.
- Place nail art tape diagonally across the nail.
- Paint the exposed section with your second color.
- Carefully remove the tape while the second polish is still wet.
- Allow the design to dry before applying top coat.
Styling tip: Use muted pastel shades for a softer, more aesthetic appearance.
9. Milky Pink Pearl Dot Nails
Milky Pink Pearl Dot Nails are inspired by delicate pearl jewelry.
This manicure features a translucent milky pink base decorated with tiny pearl-like dots.
Instead of using raised embellishments, you can create the pearl effect with opaque white polish.
The finished design looks elegant and delicate without requiring special nail decorations.
Why you’ll love it: The tiny pearl dots create a luxurious appearance with very little effort.
Best for: Bridal-inspired nails, minimalist manicures, and special occasions.
Difficulty: Very easy.
What you’ll need: Milky pink polish, opaque white polish, and a small dotting tool.
How to recreate it:
- Apply one or two thin coats of milky pink polish.
- Allow the base to dry.
- Use a dotting tool to place tiny white dots near the cuticle.
- Add one or two additional dots if desired.
- Seal the design with a glossy top coat.
Styling tip: Keep the pearl dots small and evenly spaced for a refined finish.
10. Blueberry French Tip Nails
Blueberry French Tip Nails are a fresh, colorful alternative to traditional French manicures.
This design features a soft nude base with deep blueberry-blue tips.
The contrast between the natural base and rich blue polish creates a beautiful modern appearance.
You can choose a curved French tip or a diagonal tip for a slightly more creative effect.
Why you’ll love it: The bold blue shade makes a simple French manicure feel trendy and unique.
Best for: Summer nails, everyday manicures, and colorful minimalist designs.
Difficulty: Easy.
What you’ll need: Nude polish, blueberry-blue polish, and a thin nail art brush.
How to recreate it:
- Apply a sheer nude base.
- Let the polish dry completely.
- Paint a thin curved line along the nail tip using blue polish.
- Fill in the tip carefully.
- Finish with a glossy top coat.
Styling tip: Try alternating blueberry blue and soft lavender tips for a playful variation.
11. Minimalist Gold Line Nails
Minimalist Gold Line Nails are perfect for anyone who loves understated luxury.
The design features a clean nude or beige base decorated with one delicate metallic gold line.
The line can run vertically down the center, diagonally across the nail, or near the tip.
The finished manicure feels modern, elegant, and surprisingly expensive-looking.
Why you’ll love it: One thin line can transform a plain manicure into something beautifully polished.
Best for: Work-friendly nails, minimalist manicures, and elegant everyday looks.
Difficulty: Easy.
What you’ll need: Nude polish, metallic gold polish, and a fine nail art brush.
How to recreate it:
- Apply your favorite nude nail polish.
- Allow it to dry completely.
- Use a thin brush to paint one delicate gold line.
- Keep the design minimal rather than adding multiple details.
- Seal everything with a glossy top coat.
Styling tip: A single diagonal gold line looks especially beautiful on short almond nails.
12. Peachy Sunset Ombre Nails
Peachy Sunset Ombre Nails feature a beautiful gradient inspired by soft sunset colors.
The manicure blends peach, warm pink, and delicate coral tones into one seamless finish.
Instead of sharp color blocks, the shades fade gently into one another.
This creates a dreamy, summery appearance that looks gorgeous on both short and long nails.
Why you’ll love it: A makeup sponge makes the gradient easier to create than hand-painting individual transitions.
Best for: Summer vacations, spring manicures, and soft colorful nails.
Difficulty: Easy to moderate.
What you’ll need: Peach polish, pink polish, coral polish, and a makeup sponge.
How to recreate it:
- Apply a pale pink base and allow it to dry.
- Paint narrow stripes of peach, pink, and coral polish onto a small makeup sponge.
- Gently dab the sponge over each nail.
- Repeat in thin layers until the colors blend smoothly.
- Clean excess polish around the nails.
- Finish with a glossy top coat.
Styling tip: Choose muted peach and blush tones for a soft, aesthetic finish.
13. Tiny Star Nail Art
Tiny Star Nail Art adds a delicate celestial detail to a simple manicure.
This design features miniature stars painted over a sheer nude, soft pink, or pale blue base.
You can create classic five-point stars or use simple four-point sparkle shapes.
The stars can be scattered across the nails or placed individually as small accents.
Why you’ll love it: The celestial pattern looks dreamy without requiring complicated artwork.
Best for: Everyday nails, winter manicures, and minimalist celestial nail designs.
Difficulty: Easy.
What you’ll need: Nude polish, white or silver polish, and a fine nail art brush.
How to recreate it:
- Apply your chosen base polish.
- Allow it to dry completely.
- Draw a small vertical line with white or silver polish.
- Add a shorter horizontal line across the center.
- Extend the points slightly to create a delicate sparkle shape.
- Seal the design with a glossy top coat.
Styling tip: Add only one or two tiny stars per nail for a clean, elegant finish.
14. Strawberry Milk Jelly Nails
Strawberry Milk Jelly Nails create a soft, translucent pink manicure inspired by creamy strawberry milk.
The design features a sheer pink base with a delicate glossy finish.
For extra detail, you can add tiny white dots, miniature hearts, or a subtle pink gradient.
The overall appearance is fresh, feminine, and beautifully understated.
Why you’ll love it: The sheer finish looks polished without requiring intricate nail art.
Best for: Everyday nails, minimalist manicures, and soft pink nail lovers.
Difficulty: Very easy.
What you’ll need: Sheer pink jelly polish, white polish if desired, and a glossy top coat.
How to recreate it:
- Apply a thin coat of sheer pink jelly polish.
- Let the first coat dry.
- Add another thin coat if you want more color.
- Optionally create tiny white dots on one accent nail.
- Finish with a high-shine top coat.
Styling tip: Keep the layers thin to maintain the translucent jelly appearance.
15. Abstract Wavy French Nails
Abstract Wavy French Nails combine the elegance of French tips with modern, artistic lines.
Instead of painting a traditional curved tip, this design features a soft, flowing wave near the free edge of each nail.
The waves can be created using white, chocolate brown, dusty pink, or muted sage green.
The finished manicure feels creative and sophisticated without being overly complicated.
Why you’ll love it: The abstract shape is forgiving, making it ideal for beginners who struggle with perfectly symmetrical French tips.
Best for: Everyday nails, minimalist nail art, and modern aesthetic manicures.
Difficulty: Easy.
What you’ll need: Nude polish, your chosen accent color, and a thin nail art brush.
How to recreate it:
- Apply a nude or sheer pink base.
- Allow the polish to dry.
- Paint a gently curved wave near the nail tip.
- Fill in a small section beneath the wave if desired.
- Repeat with slightly different shapes on each nail.
- Finish with a glossy top coat.
Styling tip: Try alternating chocolate brown and cream waves for a chic neutral manicure.
Essential Tools for Easy DIY Nail Art
You don’t need an expensive nail kit to create beautiful nail designs at home.
A few simple tools can help you recreate most of the looks in this guide.
| Nail Art Tool | Best For |
|---|---|
| Dotting tool | Flowers, hearts, polka dots, cherries |
| Toothpick | Tiny details and simple patterns |
| Thin nail art brush | French tips, swirls, stars, lines |
| Makeup sponge | Ombre and glitter gradients |
| Nail art tape | Geometric shapes and color blocking |
| Base coat | Helping protect nails and improve polish application |
| Top coat | Adding shine and helping the design last |
Beginner tip: Start with two or three nail polish colors and one dotting tool. You can create several different manicures without buying a large collection of supplies.
5 Easiest DIY Nail Art Ideas for Beginners
If you’re trying nail art for the first time, start with designs that don’t require precise brushwork.
| Nail Design | Difficulty | Approximate Active Design Time |
|---|---|---|
| Soft Lavender Polka Dot Nails | Very easy | 5–10 minutes |
| Tiny Heart Accent Nails | Very easy | 5–10 minutes |
| Milky Pink Pearl Dot Nails | Very easy | 5–10 minutes |
| Strawberry Milk Jelly Nails | Very easy | 5 minutes |
| Tiny Daisy Flower Nails | Very easy | 10–15 minutes |
These estimates exclude base-color application and drying time.
How to Make DIY Nail Art Look More Professional
Even simple designs can look polished when you focus on a few important details.
1. Prepare Your Nails First
Start with clean, dry nails.
Gently shape the edges with a nail file and remove any old polish before beginning.
Avoid cutting the cuticles, which help protect the nail area.
2. Apply Thin Polish Layers
Thick coats take longer to dry and are more likely to smudge.
Apply thin, even layers and allow each coat to dry before adding more polish.
3. Practice on One Accent Nail
If you’re trying a new design, begin with one accent nail.
This allows you to practice the technique without repeating it across every finger.
4. Use Contrasting Colors
Simple patterns often stand out more when the colors have enough contrast.
For example, white daisies look beautiful against blush pink, while chocolate swirls stand out against creamy beige.
5. Keep Your Design Balanced
You don’t need to decorate every nail.
A minimalist manicure with one or two accent nails can look just as beautiful as a fully decorated set.
6. Finish With Top Coat
A suitable top coat can add shine and help protect your design.
Wait until the nail art is sufficiently dry to reduce smearing.
Common DIY Nail Art Mistakes to Avoid
Using Too Much Nail Polish
Excess polish can create uneven lines, thick dots, and longer drying times.
Start with a small amount and build the design gradually.
Rushing Between Layers
Applying new polish before the previous layer has dried can cause smudging and dragging.
Choosing Designs That Are Too Complicated
If you’re a beginner, start with dots, simple flowers, and abstract swirls before attempting detailed illustrations.
Skipping Base Coat
A base coat can help reduce staining and create a more even surface for polish.
Using Unsafe Tools or Products
Use nail-safe products and clean tools. Avoid sharing nail tools without proper cleaning, and don’t apply polish over irritated or infected skin.
If you’re using gel polish, follow the manufacturer’s curing and removal instructions. Incorrect curing and skin contact with uncured gel can increase the risk of acrylate allergies.
Frequently Asked Questions
What is the easiest DIY nail art for beginners?
Polka dots, tiny hearts, simple flowers, and minimalist lines are among the easiest nail art designs for beginners.
They require very few tools and don’t depend on advanced painting techniques.
Can I create nail art without nail art tools?
Yes! A toothpick can help create small dots, hearts, and simple details.
A small makeup sponge can also be used for gradients.
What nail art looks good on short nails?
Micro French tips, tiny daisies, minimalist gold lines, small hearts, and polka dots look beautiful on short nails.
How long does DIY nail art take?
Simple designs may take around 5–15 minutes of active decorating time, while gradients and detailed patterns can take longer.
Remember to allow additional time for base coats, color coats, and drying.
How can I make DIY nail art last longer?
Start with clean nails, apply thin coats, avoid flooding the cuticle area, and use a suitable top coat.
Wearing gloves during cleaning can also help reduce exposure to water and detergents.
Is DIY nail art cheaper than salon nails?
It can be, especially if you already own nail polish and basic tools.
The total cost depends on the products you purchase and how often you create new manicures.
Can beginners do French tip nail art?
Absolutely! Beginners can start with thin French tips, diagonal tips, or abstract wavy French designs.
Practice and a fine brush can make the process easier.
Final Thoughts
These 15 easy DIY nail art ideas for beginners prove that beautiful manicures don’t have to be expensive or complicated.
From adorable Tiny Daisy Flower Nails and playful Mini Cherry Nail Art to elegant Rose Gold Glitter Gradients and Minimalist Gold Line Nails, there are plenty of gorgeous designs to try at home.
If you love cute, feminine styles, start with Tiny Heart Accent Nails, Soft Lavender Polka Dots, or Strawberry Milk Jelly Nails.
For something more sophisticated, Chocolate Swirl Nails, Blush Pink Micro French Tips, and Abstract Wavy French Nails are beautiful choices.
The secret to successful DIY nail art is starting simple, practicing patiently, and choosing designs that match your personal style.
You don’t need perfect painting skills to create something beautiful.
Pick your favorite nail polish colors, gather a few basic tools, and have fun experimenting with your next manicure.
Save these 15 DIY nail art ideas and try a new design for your next at-home manicure!