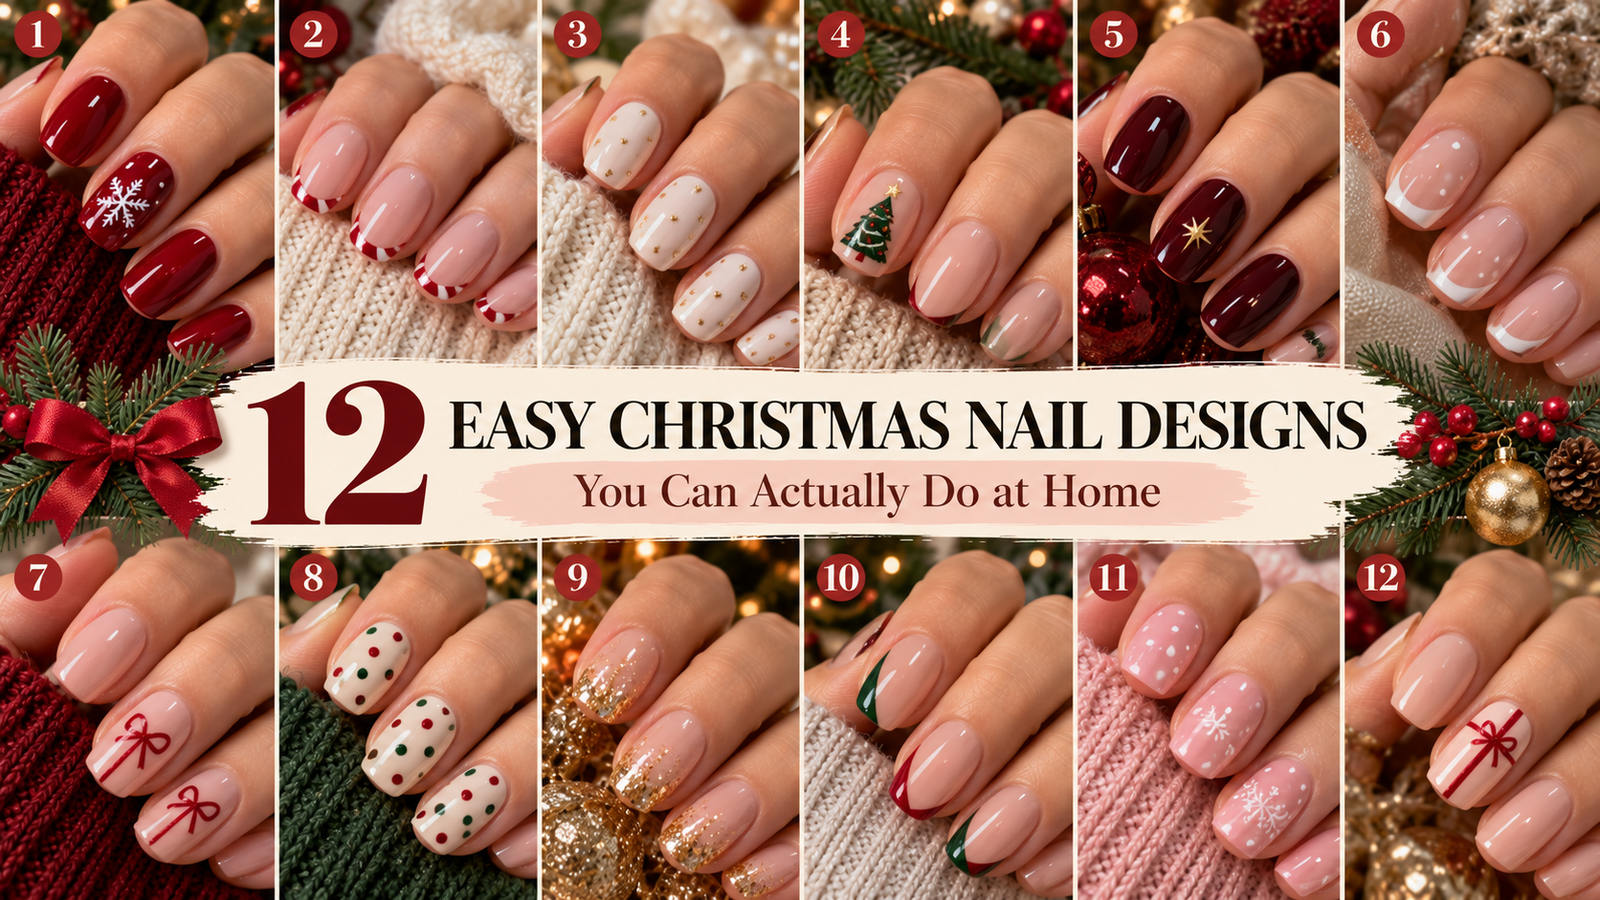
Easy Christmas nail designs for beginners don’t have to involve complicated snowflakes, expensive salon appointments, or professional nail art tools.
Sometimes, the prettiest holiday manicures are surprisingly simple.
Think tiny white snowflakes on glossy red nails, delicate candy cane French tips, miniature gold stars, and soft milky-white nails that look like fresh winter snow.
And the best part? You can recreate these looks at home, even if you’ve never tried nail art before.
Whether you prefer short natural nails, elegant almond shapes, or cute festive designs, there are plenty of beginner-friendly ways to make your manicure feel special for Christmas.
You don’t need perfect painting skills or a drawer full of expensive products. A few nail polish colors, a dotting tool, and a little patience can go a long way.
Below, we’re sharing 12 easy Christmas nail designs for beginners that are cute, wearable, and surprisingly simple to DIY.
Each idea includes the supplies you’ll need, step-by-step instructions, and helpful tips for making your manicure look neat and polished.
Let’s find your perfect holiday nails!
What You Need to Create Christmas Nail Designs at Home
Before trying these DIY Christmas nails, gather a few basic supplies.
You probably already own some of them.
Essential Nail Art Supplies
- Base coat: Helps create a smooth surface and can reduce staining.
- Red nail polish: A classic Christmas shade.
- White nail polish: Perfect for snowflakes, dots, and snowy accents.
- Green nail polish: Ideal for Christmas trees and festive French tips.
- Gold nail polish: Adds subtle holiday sparkle.
- Nude or sheer pink polish: Creates a natural-looking base.
- Top coat: Helps protect your finished manicure.
- Dotting tool: Useful for creating dots, berries, and simple patterns.
- Thin nail art brush: Helps with French tips and small details.
- Nail stickers: An easy alternative to hand-painted designs.
- Nail polish remover and a cleanup brush: Help correct small mistakes.
Beginner tip: Don’t feel pressured to buy everything at once. Many of these designs can be created using a toothpick, a small brush, and two or three nail polish colors.
Always work in a well-ventilated space and follow the instructions on your nail products.
12 Easy Christmas Nail Designs for Beginners
1. Classic Red Nails With One Tiny Snowflake
Difficulty: Very Easy
Time: Approximately 20–30 minutes, plus any additional drying time
Best Nail Shape: Short square or oval
Sometimes, the simplest Christmas nails are the most beautiful.
This design features glossy cherry-red nails with one delicate white snowflake on an accent finger.
Instead of painting complicated winter scenes across every nail, you only need to decorate one.
The contrast between rich red polish and a tiny white snowflake creates a festive manicure that looks elegant without being overwhelming.
What You’ll Need
- Cherry-red nail polish
- White nail polish
- Base coat
- Thin nail art brush or snowflake sticker
- Glossy top coat
How to Recreate It
- Apply a thin layer of base coat.
- Paint your nails with two thin coats of cherry-red polish.
- Allow the polish to dry.
- On one accent nail, paint three thin intersecting lines to form a simple six-point snowflake.
- Add tiny dots near the ends if you want extra detail.
- Let the design dry before applying top coat.
Beginner shortcut: Use a miniature white snowflake nail sticker instead of painting it by hand.
Why You’ll Love It: It’s festive, elegant, and easy enough for your first DIY Christmas manicure.
Styling Tip: Pair these nails with a cream sweater and delicate gold jewelry.
2. Candy Cane Micro French Tips
Difficulty: Easy
Time: Approximately 30–40 minutes
Best Nail Shape: Short almond or squoval
Candy cane nails are a Christmas classic, but this version feels more minimalist and sophisticated.
Instead of covering the entire nail with red-and-white stripes, create a thin red French tip over a sheer nude base.
Add one tiny diagonal white stripe to each tip for a subtle candy cane effect.
The result is festive without looking overly busy.
What You’ll Need
- Sheer nude nail polish
- Red nail polish
- White nail polish
- Thin nail art brush
- Glossy top coat
How to Recreate It
- Apply a sheer nude base.
- Allow the polish to dry.
- Paint a thin red French tip along each nail.
- Add one or two tiny diagonal white stripes across the red tips.
- Let the nail art dry.
- Finish with a glossy top coat.
Beginner shortcut: Use French-tip nail guides to help create clean lines.
Why You’ll Love It: The design looks delicate and modern while still feeling unmistakably Christmas-inspired.
Styling Tip: Wear it with cozy white knitwear and red accessories.
3. Milky White Nails With Gold Dots
Difficulty: Very Easy
Time: Approximately 20–30 minutes
Best Nail Shape: Short oval
If you love minimalist nail designs, this manicure is perfect.
A soft milky-white base creates a clean winter look, while tiny champagne-gold dots add just enough festive sparkle.
The dots can be placed near the cuticle or arranged in a delicate vertical line.
You don’t need any complicated painting techniques.
What You’ll Need
- Milky-white nail polish
- Gold nail polish
- Dotting tool or toothpick
- Base coat
- Top coat
How to Recreate It
- Apply your base coat.
- Paint two thin layers of milky-white polish.
- Let the polish dry.
- Dip a dotting tool into gold polish.
- Place one small gold dot near the cuticle of each nail.
- Finish with top coat once the dots are dry.
Beginner shortcut: Use small metallic nail stickers for perfectly consistent dots.
Why You’ll Love It: These nails look polished, expensive, and appropriate for the entire winter season.
Styling Tip: Pair with pearl jewelry and an ivory sweater.
4. Mini Christmas Tree Accent Nails
Difficulty: Easy
Time: Approximately 30–40 minutes
Best Nail Shape: Short square
You don’t need to be an artist to create a cute Christmas tree manicure.
This design features a sheer nude base with one miniature green Christmas tree on an accent nail.
Keep the tree simple using three small green triangles stacked vertically.
Add a tiny gold dot at the top to represent a star.
What You’ll Need
- Sheer nude nail polish
- Forest-green nail polish
- Gold nail polish
- Thin nail art brush
- Top coat
How to Recreate It
- Apply a sheer nude base.
- Allow it to dry.
- Paint three small green triangles, stacking them from smallest to largest.
- Add a tiny gold dot above the tree.
- Let the design dry.
- Finish with top coat.
Beginner shortcut: Use a miniature Christmas tree nail sticker.
Why You’ll Love It: It’s playful and festive without requiring detailed illustrations.
Styling Tip: Pair with an emerald-green sweater and gold rings.
5. Burgundy Nails With a Tiny Gold Star
Difficulty: Very Easy
Time: Approximately 20–30 minutes
Best Nail Shape: Short almond
If bright red Christmas nails aren’t your style, try a deep burgundy manicure instead.
The rich wine color creates an elegant holiday look.
Add a tiny gold star to one nail for a delicate festive detail.
This design is particularly beautiful on short natural nails.
What You’ll Need
- Burgundy nail polish
- Gold star nail stickers
- Base coat
- Glossy top coat
How to Recreate It
- Apply a base coat.
- Paint your nails with two thin coats of burgundy polish.
- Allow the polish to dry.
- Place one small gold star sticker on your ring finger.
- Press the sticker flat.
- Seal with top coat.
Beginner shortcut: Choose self-adhesive nail stickers rather than painting stars.
Why You’ll Love It: It combines classic Christmas colors with a sophisticated, minimalist finish.
Styling Tip: Pair with burgundy satin and antique gold jewelry.
6. Snowy French Tip Nails
Difficulty: Easy
Time: Approximately 30–40 minutes
Best Nail Shape: Short square or oval
Snowy French tips are a beautiful alternative to traditional white French manicures.
The base remains sheer pink, while the tips feature soft white polish.
Add two or three tiny white dots near the tips to create the appearance of falling snow.
The finished manicure feels delicate and winter-inspired.
What You’ll Need
- Sheer pink polish
- White polish
- Dotting tool
- French-tip guides
- Glossy top coat
How to Recreate It
- Apply a sheer pink base.
- Let it dry.
- Use French-tip guides to paint white tips.
- Remove the guides carefully.
- Add two or three small white dots below the tips.
- Finish with top coat once dry.
Beginner shortcut: Skip the dots and create simple white French tips if you’re new to nail art.
Why You’ll Love It: The design looks clean, elegant, and suitable for Christmas or everyday winter wear.
Styling Tip: Pair with soft gray knitwear and silver jewelry.
7. Tiny Red Bow Nails
Difficulty: Easy
Time: Approximately 25–35 minutes
Best Nail Shape: Short almond
Bow nails are perfect if you love feminine, romantic nail designs.
For this Christmas version, start with a sheer pink or milky nude base.
Add one tiny red bow to an accent nail.
The bow can be painted using two small loops and two short ribbon tails.
Keep the design delicate rather than oversized.
What You’ll Need
- Sheer pink nail polish
- Red nail polish
- Thin nail art brush
- Top coat
How to Recreate It
- Apply a sheer pink base.
- Let the polish dry.
- Paint two tiny red loops beside each other.
- Add a small dot where the loops meet.
- Paint two short ribbon tails.
- Allow the design to dry before applying top coat.
Beginner shortcut: Use miniature red bow nail stickers.
Why You’ll Love It: It creates a cute gift-inspired manicure without complicated nail art.
Styling Tip: Pair with a satin hair bow and a cream cardigan.
8. Christmas Polka Dot Nails
Difficulty: Very Easy
Time: Approximately 20–30 minutes
Best Nail Shape: Short squoval
Polka dot nails are one of the easiest nail art designs to recreate at home.
For Christmas, choose a soft cream base and add tiny red and green dots.
You can create evenly spaced dots or arrange them randomly for a playful effect.
This manicure is ideal for beginners who want colorful holiday nails without using nail stickers.
What You’ll Need
- Cream nail polish
- Red nail polish
- Forest-green nail polish
- Dotting tool or toothpick
- Top coat
How to Recreate It
- Apply two thin coats of cream polish.
- Allow the base to dry.
- Dip your dotting tool into red polish.
- Add a few small red dots.
- Clean the tool and repeat with green polish.
- Let everything dry before applying top coat.
Beginner shortcut: Create the dots on just one or two accent nails.
Why You’ll Love It: It’s cute, cheerful, and doesn’t require advanced painting skills.
Styling Tip: Pair with a red sweater and simple gold jewelry.
9. Champagne Glitter Gradient Nails
Difficulty: Very Easy
Time: Approximately 25–35 minutes
Best Nail Shape: Short oval or almond
If you want Christmas nails that look glamorous but are easy to create, try a champagne glitter gradient.
This manicure features a sheer nude base with delicate glitter concentrated near the tips.
The glitter gradually fades toward the center of each nail.
The result looks festive without being overly dramatic.
What You’ll Need
- Sheer nude nail polish
- Fine champagne glitter polish
- Small makeup sponge, optional
- Top coat
How to Recreate It
- Apply a sheer nude base.
- Let it dry.
- Brush a small amount of champagne glitter polish onto the tips.
- Use a nearly dry brush or small sponge to soften the glitter toward the center.
- Add another thin layer at the tips if needed.
- Finish with a glossy top coat.
Beginner shortcut: Use a fine glitter polish with a clear base.
Why You’ll Love It: It creates a soft holiday sparkle without requiring precise lines.
Styling Tip: Pair with champagne-colored clothing and pearl accessories.
10. Red and Green Side French Nails
Difficulty: Easy
Time: Approximately 30–40 minutes
Best Nail Shape: Short almond
If you want something more modern than traditional Christmas nail art, try side French tips.
Instead of painting the tips across the top of the nail, create a slim curved line along one side.
Alternate between deep red and forest green.
The result is minimalist, creative, and festive.
What You’ll Need
- Sheer nude polish
- Deep red polish
- Forest-green polish
- Thin nail art brush
- Top coat
How to Recreate It
- Apply a sheer nude base.
- Let the polish dry.
- Use a thin brush to paint a curved red line along one side of the first nail.
- Repeat with green on the next nail.
- Alternate the colors across your manicure.
- Finish with top coat.
Beginner shortcut: Practice the curved lines on paper before painting your nails.
Why You’ll Love It: The unusual placement gives a classic holiday color combination a modern look.
Styling Tip: Pair with neutral outfits so the nail art stands out.
11. Soft Pink Nails With White Snow Dots
Difficulty: Very Easy
Time: Approximately 20–30 minutes
Best Nail Shape: Short oval
If you prefer soft, feminine Christmas nails, this manicure is a beautiful option.
Start with a delicate baby-pink base and add tiny white dots to resemble falling snow.
Unlike detailed snowflake designs, this look requires only a dotting tool.
The dots should vary slightly in size and placement for a natural effect.
What You’ll Need
- Baby-pink nail polish
- White nail polish
- Dotting tool
- Glossy top coat
How to Recreate It
- Apply a soft pink base.
- Allow the polish to dry.
- Add small white dots across each nail.
- Use slightly different dot sizes.
- Leave some negative space.
- Finish with top coat.
Beginner shortcut: Decorate only your ring fingers for a more minimalist manicure.
Why You’ll Love It: It’s simple, romantic, and beautiful on short natural nails.
Styling Tip: Pair with pink knitwear and silver jewelry.
12. Minimalist Christmas Gift Nails
Difficulty: Easy
Time: Approximately 30–40 minutes
Best Nail Shape: Short square
Our final design is inspired by beautifully wrapped Christmas presents.
Start with a creamy nude base and paint two thin intersecting red lines on one accent nail.
The lines should resemble ribbon wrapped around a gift.
Add a tiny bow where they meet if you’re comfortable with detail work.
The remaining nails can stay plain or feature glossy red polish.
What You’ll Need
- Creamy nude nail polish
- Red nail polish
- Thin nail art brush
- Top coat
How to Recreate It
- Apply a creamy nude base.
- Allow it to dry.
- Paint one thin vertical red line down the accent nail.
- Add a horizontal red line crossing it.
- Paint a tiny bow at the intersection if desired.
- Finish with a glossy top coat.
Beginner shortcut: Skip the bow and use only the intersecting ribbon lines.
Why You’ll Love It: The design feels festive and creative while remaining achievable for beginners.
Styling Tip: Pair with red satin accessories and a cozy ivory sweater.
Which Christmas Nail Design Is Easiest for Beginners?
Not all nail art requires the same amount of practice.
If this is your first time trying DIY Christmas nails, start with a design that uses simple dots, stickers, or solid colors.
| Nail Design | Difficulty | Best for Short Nails | Special Tools |
|---|---|---|---|
| Red Nails With Snowflake | Very Easy With Sticker | Yes | Snowflake sticker or brush |
| Candy Cane Micro French | Easy | Yes | Thin brush |
| Milky White With Gold Dots | Very Easy | Yes | Dotting tool |
| Mini Christmas Tree | Easy | Yes | Thin brush |
| Burgundy With Gold Star | Very Easy | Yes | Star sticker |
| Snowy French Tips | Easy | Yes | French-tip guides |
| Tiny Red Bow Nails | Easy With Sticker | Yes | Bow sticker or brush |
| Christmas Polka Dots | Very Easy | Yes | Dotting tool |
| Champagne Glitter Gradient | Very Easy | Yes | Optional sponge |
| Red and Green Side French | Easy | Yes | Thin brush |
| Soft Pink Snow Dots | Very Easy | Yes | Dotting tool |
| Christmas Gift Nails | Easy | Yes | Thin brush |
Our recommendation: Start with Milky White Nails With Gold Dots, Christmas Polka Dot Nails, or Champagne Glitter Gradient Nails.
These designs are forgiving and don’t require perfectly straight lines.
How to Do Christmas Nail Art on Short Natural Nails
Short natural nails are perfect for beginner-friendly Christmas manicures.
You don’t need acrylic extensions or long almond shapes to create beautiful holiday designs.
Step 1: Shape Your Nails
Use a nail file to create a consistent shape.
Short oval, square, and squoval nails are practical choices.
Step 2: Clean Your Nails
Remove old polish and gently clean your nails.
Avoid aggressive buffing or cutting healthy cuticle tissue.
Step 3: Apply Base Coat
A thin base coat helps prepare the nail surface for polish.
Step 4: Use Thin Polish Layers
Two thin coats usually look smoother than one thick coat.
Follow the drying instructions for your chosen product.
Step 5: Add Simple Nail Art
Begin with dots, stickers, or small accent designs.
You can experiment with French tips and detailed illustrations as your skills improve.
Step 6: Finish With Top Coat
Allow the nail art to dry before applying top coat.
Use gentle brush strokes to avoid smearing the design.
7 Beginner Nail Art Mistakes to Avoid
Even easy Christmas nail designs can become frustrating if you rush the process.
Here are seven common mistakes and how to avoid them.
1. Applying Thick Layers of Polish
Thick layers can dry unevenly and smudge more easily.
Apply thin coats and allow enough drying time.
2. Starting With Complicated Designs
Detailed Christmas characters and intricate illustrations can be difficult for beginners.
Start with dots, French tips, or stickers.
3. Using Too Much Polish on Your Brush
Too much polish can create uneven lines.
Remove excess product before painting small details.
4. Skipping Base Coat
A base coat helps prepare the nail surface and can reduce staining from dark polish.
5. Applying Top Coat Too Early
Top coat can drag wet nail art across the nail.
Allow your design to dry sufficiently before sealing it.
6. Trying to Make Every Nail Perfectly Identical
Small differences are normal when painting nails by hand.
A cohesive color palette matters more than perfect symmetry.
7. Using Gel Products Without Proper Equipment
Regular nail polish and gel polish are different systems.
Gel products require compatible equipment and correct curing procedures. Improper application or skin exposure to uncured gel can increase the risk of allergic reactions.
If you’re a beginner, regular air-dry nail polish is a straightforward place to start.
How to Make Your DIY Christmas Nails Last Longer
Once you’ve finished your manicure, a few simple habits can help keep it looking beautiful.
Start with clean nails. Remove oils and residue before applying polish.
Use a base coat. This helps create a smooth foundation.
Apply thin layers. Thin coats generally dry more evenly.
Seal with top coat. Follow the product instructions and cover the free edge when practical.
Moisturize your hands. Use hand cream and cuticle oil to keep the surrounding skin comfortable.
Wear gloves when cleaning. This can help protect your nails from prolonged water exposure and detergents.
Avoid using your nails as tools. Opening packages or scraping surfaces with your nails can cause chips.
Frequently Asked Questions
What are the easiest Christmas nail designs for beginners?
Polka dot nails, glitter gradients, simple snow dots, and solid red nails with holiday stickers are among the easiest options.
They require minimal tools and little nail art experience.
Can I do Christmas nails at home without nail art tools?
Yes!
You can use a toothpick for dots, small nail stickers for detailed accents, and regular polish brushes for simple designs.
A thin nail art brush is helpful but not necessary for every manicure.
What Christmas nail designs look good on short nails?
Micro French tips, tiny bows, snow dots, miniature stars, and simple glitter gradients look beautiful on short natural nails.
What nail colors should beginners use for Christmas?
Red, white, forest green, gold, champagne, and sheer nude are versatile Christmas nail colors.
You can create several different manicures using just two or three shades.
Are Christmas nail stickers easy to use?
Yes. Nail stickers are one of the simplest ways to add detailed holiday designs.
Apply them over sufficiently dry polish, press them flat, and seal with top coat according to the sticker instructions.
How long does DIY Christmas nail art take?
Simple designs may take around 20–40 minutes to apply, but the total time depends on the number of coats, design complexity, and drying time.
Regular nail polish may need additional time to fully harden.
Do I need long nails for Christmas nail art?
No. Short natural nails are suitable for many Christmas designs, especially dots, stickers, French tips, and simple accents.
Can I use regular nail polish for Christmas nail art?
Absolutely.
Regular nail polish is suitable for all 12 designs in this article.
You don’t need gel polish or a UV lamp to create a festive manicure.
Final Thoughts
Creating beautiful holiday nails doesn’t have to be complicated or expensive.
With a few nail polish colors, simple tools, and a little creativity, you can recreate festive manicures that look cute, elegant, and polished.
From Classic Red Nails With One Tiny Snowflake and Candy Cane Micro French Tips to Milky White Nails With Gold Dots and Champagne Glitter Gradient Nails, these 12 easy Christmas nail designs for beginners offer something for every style.
If you’re completely new to nail art, start with Christmas Polka Dot Nails or Soft Pink Nails With White Snow Dots.
For something more elegant, try Burgundy Nails With a Tiny Gold Star or Snowy French Tip Nails.
And if you love feminine holiday details, Tiny Red Bow Nails and Minimalist Christmas Gift Nails are adorable choices.
The secret is to start simple, practice a little, and enjoy creating something beautiful.
Which of these easy Christmas nail designs will you try first?